Creating a Cube
This example demonstrates how to use the xeokit SDK to create and display a 3D box in the browser.
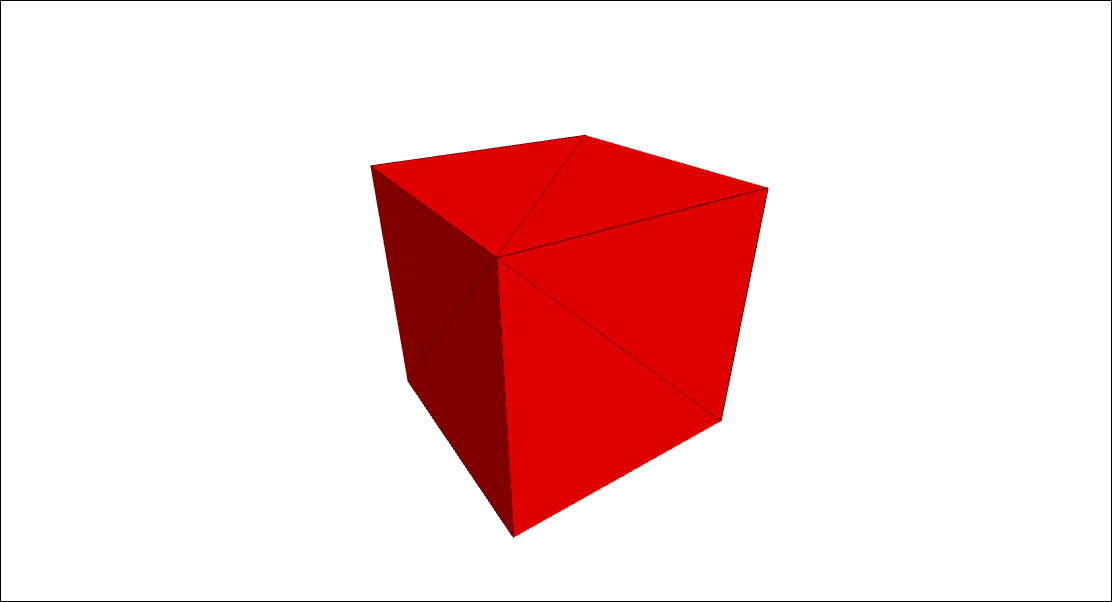
Click on the preview below to run the example. Scroll down to learn how it's made.
Creating a Cube
HTML
Listed below is the HTML for this example.
<!doctype html>
<html>
<head>
    <meta charset="utf-8">
    <meta http-equiv="X-UA-Compatible" content="IE=edge,chrome=1">
    <meta name="viewport" content="width=device-width, initial-scale=1">
    <title>Creating a Cube</title>
    <style>
        body {
            background-color: white;
            overflow: hidden;
            margin: 0;
            user-select: none;
        }

        #demoCanvas {
            width: 100%;
            height: 100%;
            position: absolute;
            background: white;
            border: 0;
        }
    </style>
</head>
<body>
<canvas id="demoCanvas"></canvas>
</body>
<script type="module" src="./index.js"></script>
</html>
JavaScript
Listed below is the JavaScript for this example, which we'll break down into steps.
1. Import the SDK from a bundle built for these examples
import * as xeokit from "../../js/xeokit-demo-bundle.js";
import {DemoHelper} from "../../js/DemoHelper.js";
2. Create a Scene
@xeokit/sdk / scene / Scene / Class Scene Container of model geometry and materials.
const scene = new xeokit.scene.Scene();
3. Create a WebGLRenderer
@xeokit/sdk / webglrenderer / WebGLRenderer / Class WebGLRenderer WebGL rendering strategy for a Viewer.
const renderer = new xeokit.webglrenderer.WebGLRenderer({});
4. Create a Viewer
@xeokit/sdk / viewer / Viewer / Class Viewer 3D model viewer.
const viewer = new xeokit.viewer.Viewer({
    id: "demoViewer",
    scene,
    renderer
});
5. Ignore the DemoHelper
const demoHelper = new DemoHelper({
    viewer
});
demoHelper.init().then(() => {
6. Create a single View
@xeokit/sdk / viewer / View / Class View An independent view within a Viewer, with its own canvas, Camera and object visual states.
    const view = viewer.createView({
        id: "demoView",
        elementId: "demoCanvas"
    });
7. Position the View's Camera
@xeokit/sdk / viewer / Camera / Class Camera Controls the viewpoint and projection for a View.
    view.camera.eye = [2, 3, 2];
    view.camera.look = [0, 0, 0];
    view.camera.up = [0, 0, 1];
8. Add a CameraControl
@xeokit/sdk / cameracontrol / CameraControl / Class CameraControl Mouse and touch controller for a Viewer's Camera.
new xeokit.cameracontrol.CameraControl(view);
9. Within the Scene, create a SceneModel
@xeokit/sdk / scene / SceneModel / Class SceneModel Contains a model's geometry and materials.
    const sceneModel = scene.createModel({
        id: "demoModel"
    });
10. Create a SceneGeometry
@xeokit/sdk / scene / SceneGeometry / Class SceneGeometry A geometry in a SceneModel.
    sceneModel.createGeometry({
        id: "boxGeometry",
        primitive: xeokit.constants.TrianglesPrimitive,
11. Define the SceneGeometry vertices - eight for our box, each one spanning three array elements for X,Y and Z
        positions: [
            1.0, 1.0, 1.0, // v0-v1-v2-v3 front
            -1.0, 1.0, 1.0,
            -1.0, -1.0, 1.0,
            1.0, -1.0, 1.0,
            1.0, 1.0, 1.0, // v0-v3-v4-v1 right
            1.0, -1.0, 1.0,
            1.0, -1.0, -1.0,
            1.0, 1.0, -1.0,
            1.0, 1.0, 1.0, // v0-v1-v6-v1 top
            1.0, 1.0, -1.0,
            -1.0, 1.0, -1.0,
            -1.0, 1.0, 1.0,
            -1.0, 1.0, 1.0,  // v1-v6-v7-v2 left
            -1.0, 1.0, -1.0,
            -1.0, -1.0, -1.0,
            -1.0, -1.0, 1.0,
            -1.0, -1.0, -1.0, // v7-v4-v3-v2 bottom
            1.0, -1.0, -1.0,
            1.0, -1.0, 1.0,
            -1.0, -1.0, 1.0,
            1.0, -1.0, -1.0,  // v4-v7-v6-v1 back
            -1.0, -1.0, -1.0,
            -1.0, 1.0, -1.0,
            1.0, 1.0, -1.0
        ],
12. Define the SceneGeometry indices - these organise the positions coordinates into geometric primitives in accordance with the TrianglesPrimitive
@xeokit/sdk / constants / TrianglesPrimitive / Variable TrianglesPrimitive Non-closed triangle mesh primitive type.
        indices: [
            0, 1, 2,   // Front
            0, 2, 3,
            4, 5, 6,  // Right
            4, 6, 7,
            8, 9, 10, // Top
            8, 10, 11,
            12, 13, 14,   // Left
            12, 14, 15,
            16, 17, 18,  // Bottom
            16, 18, 19,
            20, 21, 22,// Back
            20, 22, 23
        ]
    });
13. Create a red SceneMesh
@xeokit/sdk / scene / SceneMesh / Class SceneMesh A mesh in a SceneModel.
    sceneModel.createMesh({
        id: "boxMesh",
        geometryId: "boxGeometry",
        position: [0, 0, 0], // Default
        scale: [1, 1, 1], // Default
        rotation: [0, 0, 0], // Default
        color: [1.0, 0.0, 0.0] // Default is [1,1,1]
    });
14. Create a SceneObject
@xeokit/sdk / scene / SceneObject / Class SceneObject An object within a SceneModel.
    sceneModel.createObject({
        id: "boxObject",
        meshIds: ["boxMesh"]
    });
15. Build the SceneModel, causing the red box to appear in the View's canvas.
sceneModel.build().then(() => {
16. At this point, the View will contain a single ViewObject
@xeokit/sdk / viewer / ViewObject / Class ViewObject An object within a View.
        view.objects["boxObject"].highlighted = true;
        view.setObjectsHighlighted(view.highlightedObjectIds, false);
17. Ignore the DemoHelper
        demoHelper.finished();
    }).catch(reason => {
        console.error(reason);
        demoHelper.finished();
    });
});