Creating a 3D Model from JSON
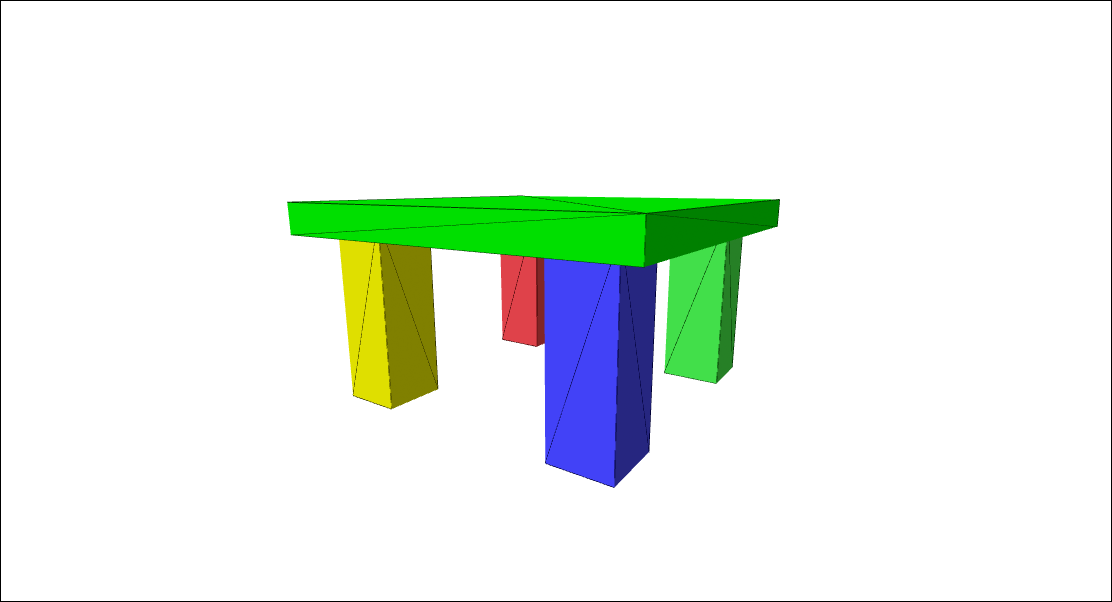
In this example, we'll use the xeokit SDK to build and view a table-shaped SceneModel, from JSON
Click on the preview below to run the example. Scroll down to learn how it's made.
Creating a 3D Model from JSON
HTML
Listed below is the HTML for this example.
<!doctype html>
<html>
<head>
    <meta charset="utf-8">
    <meta http-equiv="X-UA-Compatible" content="IE=edge,chrome=1">
    <meta name="viewport" content="width=device-width, initial-scale=1">
    <title>Creating a 3D Model from JSON</title>
    <style>
        body {
            background-color: white;
            overflow: hidden;
            margin: 0;
            user-select: none;
        }

        #demoCanvas {
            width: 100%;
            height: 100%;
            position: absolute;
            background: white;
            border: 0;
        }
    </style>
</head>
<body>
<canvas id="demoCanvas"></canvas>
</body>
<script type="module" src="./index.js"></script>
</html>
JavaScript
Listed below is the JavaScript for this example, which we'll break down into steps.
import * as xeokit from "../../js/xeokit-demo-bundle.js";
import {DemoHelper} from "../../js/DemoHelper.js";
1. Create a Scene
@xeokit/sdk / scene / Scene / Class Scene Container of model geometry and materials.
const scene = new xeokit.scene.Scene();
2. Create a WebGLRenderer
@xeokit/sdk / webglrenderer / WebGLRenderer / Class WebGLRenderer WebGL rendering strategy for a Viewer.
const renderer = new xeokit.webglrenderer.WebGLRenderer({});
3. Create a Viewer
@xeokit/sdk / viewer / Viewer / Class Viewer 3D model viewer.
const viewer = new xeokit.viewer.Viewer({
    id: "demoViewer",
    scene,
    renderer
});
4. Ignore the DemoHelper
const demoHelper = new DemoHelper({
    elementId: "info-container",
    viewer
});
demoHelper.init()
    .then(() => {
5. Give the Viewer a single View
@xeokit/sdk / viewer / View / Class View An independent view within a Viewer, with its own canvas, Camera and object visual states.
        const view = viewer.createView({
            id: "demoView",
            elementId: "demoCanvas"
        });
6. Position the View's Camera
@xeokit/sdk / viewer / Camera / Class Camera Controls the viewpoint and projection for a View.
        view.camera.eye = [10, -2, 15];
        view.camera.look = [0, -6, 0];
        view.camera.up = [0, 1, 0];
7. Add a CameraControl
@xeokit/sdk / cameracontrol / CameraControl / Class CameraControl Mouse and touch controller for a Viewer's Camera.
new xeokit.cameracontrol.CameraControl(view);
8. Within the Scene, create a SceneModel
@xeokit/sdk / scene / SceneModel / Class SceneModel Contains a model's geometry and materials. @xeokit/sdk / scene / SceneModelParams / Interface SceneModelParams Parameters for a SceneModel.
        const sceneModel = scene.createModel({
            id: "demoModel"
        });
        if (sceneModel instanceof xeokit.core.SDKError) {
            console.error(`Error creating SceneModel: ${sceneModel.message}`);
        } else {
            sceneModel.fromParams({ // SceneModelParams
                geometries: [
                    {
                        id: "demoBoxGeometry",
                        primitive: xeokit.constants.TrianglesPrimitive,
                        positions: [
                            1, 1, 1, -1, 1, 1, -1, -1, 1, 1, -1, 1, 1, 1, 1, 1, -1, 1, 1, -1, -1, 1, 1, -1, 1, 1, 1, 1, 1, -1, -1, 1,
                            -1, -1, 1, 1, -1, 1, 1, -1, 1, -1, -1, -1, -1, -1, -1, 1, -1, -1, -1, 1, -1, -1, 1, -1, 1, -1, -1, 1, 1,
                            -1, -1, -1, -1, -1, -1, 1, -1, 1, 1, -1
                        ],
                        uvs: [
                            1, 0, 0, 0, 0, 1, 1, 1,// v0-v1-v2-v3 front
                            0, 0, 0, 1, 1, 1, 1, 0,// v0-v3-v4-v1 right
                            1, 1, 1, 0, 0, 0, 0, 1,// v0-v1-v6-v1 top
                            1, 0, 0, 0, 0, 1, 1, 1,// v1-v6-v7-v2 left
                            0, 1, 1, 1, 1, 0, 0, 0,// v7-v4-v3-v2 bottom
                            0, 1, 1, 1, 1, 0, 0, 0 // v4-v7-v6-v1 back
                        ],
                        indices: [
                            0, 1, 2, 0, 2, 3,            // front
                            4, 5, 6, 4, 6, 7,            // right
                            8, 9, 10, 8, 10, 11,         // top
                            12, 13, 14, 12, 14, 15,      // left
                            16, 17, 18, 16, 18, 19,      // bottom
                            20, 21, 22, 20, 22, 23
                        ]
                    }
                ],
                meshes: [
                    {
                        id: "redLeg-mesh",
                        geometryId: "demoBoxGeometry",
                        position: [-4, -6, -4],
                        scale: [1, 3, 1],
                        rotation: [0, 0, 0],
                        color: [1, 0.3, 0.3]
                    },
                    {
                        id: "greenLeg-mesh",
                        geometryId: "demoBoxGeometry",
                        position: [4, -6, -4],
                        scale: [1, 3, 1],
                        rotation: [0, 0, 0],
                        color: [0.3, 1.0, 0.3]
                    },
                    {
                        id: "blueLeg-mesh",
                        geometryId: "demoBoxGeometry",
                        position: [4, -6, 4],
                        scale: [1, 3, 1],
                        rotation: [0, 0, 0],
                        color: [0.3, 0.3, 1.0]
                    },
                    {
                        id: "yellowLeg-mesh",
                        geometryId: "demoBoxGeometry",
                        position: [-4, -6, 4],
                        scale: [1, 3, 1],
                        rotation: [0, 0, 0],
                        color: [1.0, 1.0, 0.0]
                    },
                    {
                        id: "tableTop-mesh",
                        geometryId: "demoBoxGeometry",
                        position: [0, -3, 0],
                        scale: [6, 0.5, 6],
                        rotation: [0, 0, 0],
                        color: [1.0, 0.3, 1.0]
                    }
                ],
                objects: [
                    {
                        id: "redLeg",
                        meshIds: ["redLeg-mesh"]
                    },
                    {
                        id: "greenLeg",
                        meshIds: ["greenLeg-mesh"]
                    },
                    {
                        id: "blueLeg",
                        meshIds: ["blueLeg-mesh"]
                    },
                    {
                        id: "yellowLeg",
                        meshIds: ["yellowLeg-mesh"]
                    },
                    {
                        id: "purpleTableTop",
                        meshIds: ["tableTop-mesh"]
                    }]
            });
9. Build the SceneModel. The View will now contain a ViewObject
@xeokit/sdk / viewer / ViewObject / Class ViewObject An object within a View. @xeokit/sdk / scene / SceneObject / Class SceneObject An object within a SceneModel.
sceneModel.build().then(() => {
10. At this point, the View will contain five ViewObjects that have the same IDs as our SceneObjects. Through these ViewObjects, we can update the appearance of our model elements in that View. We'll make the yellow leg translucent, highlight the red leg and make the tabletop green.
                view.objects["yellowLeg"].opacity = 0.5;
                view.objects["redLeg"].highlighted = true;
                view.objects["purpleTableTop"].colorize = [0,1,0];
11. We can also apply
@xeokit/sdk / utils / apply / Function apply2
@xeokit/sdk / utils / apply2 / Function apply2 Add non-null/defined properties of o to o2. Add properties of o to o2, overwriting them on o2 if already there.
                view.setObjectsOpacity(view.opacityObjectIds, 1.0);
                view.setObjectsHighlighted(view.highlightedObjectIds, false);
                view.setObjectsSelected(view.selectedObjectIds, false);
                demoHelper.finished();
            });
        }
    });